Impulse Purchase Production File
- Article
- 3 Sep 2025
- 3 min read

The animated video of Impulse Purchase is a Blender Studio open project. This means that the production files and assets are all available to Blender Studio subscribers to explore, dissect, and learn from.
This article breaks down the technical setup of this unique project, and at the end you'll get the file that makes it all happen! There are a few interesting aspects here:
- The entire project is contained in a single .blend file, which uses the EEVEE viewport and can run in realtime
- The main character and runway is fully procedural, built with Geometry Nodes
- The camera dynamically updates to however the characters parameters change
- Part of the animation (mouth, eyes, head tilt) can be driven by a live-linked app via OSC
Performance
One of the goals of the production was to build a highly interactive, viewport-centric setup, so that the video could be recorded in one take. By adding the music as a sound strip in the VSE, keyframing strategic set pieces, shaders and node setups, we were able to build a solid scaffolding upon which we could record the live facial performance. The setup uses straightforward shaders and simple shapes to achieve 30fps viewport playback when using EEVEE.
Procedural setup
The main character is built out of simple shapes, following Lucas Zanotto's design language. The shapes, the overall proportions and color palette are driven by a set of bones, which in turn controls in Geometry Nodes setups. This allows the creation of thousands of potential variants for the character.
Simulation nodes play a big role in the setup, as they are used to spawn bubbles, scene elements, handle jiggling limbs, and also the dynamic positioning of the camera towards the character.
Building the scene as procedurally as possible, and yet following a clear design system, helped to achieve countless variants that feel consistent and make the video really fun to watch.
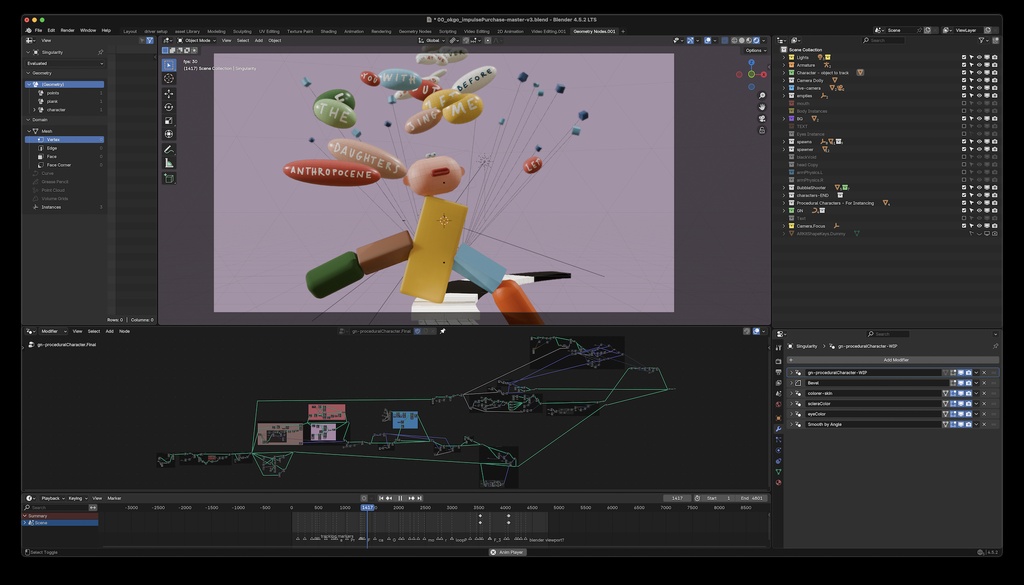
A screenshot of the production file, available below
Live animation and Puppeteering
To achieve an entertaining facial performance by the main character, we choose to use live motion capture, rather than relying on keyframe animation. By developing a bespoke add-on, we have enabled the integration of Live Link Face, a free facial motion capture app, with Blender to drive parts of the procedural character setup.
At the core of it lies the OSC (Open Sound Control) protocol. This is a well-known network communication protocol used by applications to exchange live data, usually in the context of musical performances.

The Blender + OSC + Geometry Nodes Setup
The setup is straightforward: on the Blender side, we set up a "receiver" mesh with a number of shape keys matching the ARKit blendshapes, which are used to drive the bones controlling the Geometry Nodes setup of the main character. We use the Foscap add-on to run a very minimal OSC server, which listens to network traffic and processes it to set (live) the value of the shape keys in the receiver mesh.
Get the production file
And there it is. It's one file! Download it, open it, and see how everything works. The outliner and the node editor are the best tools to help navigate the setup to discover how things come together.

Blender File - 8.9 MB - CC BY-SAokgo_impulse_purchase-v3.blend
If you have questions, feel free to leave a comment below. Thanks!
Join to leave a comment.